| ICY DOCK SSD/HDD RAID Enclosures for 5.25" Optical Drive Bay | |
| • | Dual 2.5"+3.5" SATA Drive + HW RAID 1 & JBOD w/ Advanced RAID status Indicators – MB901SPR-B R1 |
| • | Dual 2.5" SATA SSD/HDD + HW RAID 1 & JBOD w/ Advanced RAID status Indicators – MB902SPR-B R1 |
| ICY DOCK SSD/HDD RAID Enclosures for External 3.5" Drive Bay | |
| • | Dual 2.5" SATA SSD/HDD + HW RAID-0/1/BIG/JBOD – MB992SKR-B |
| ICY DOCK 2.5" SSD/HDD to 3.5" HDD RAID Adapter for 3.5" HDD Bay | |
| • | Dual 2.5" SATA SSD/HDD + HW RAID-0/1/BIG/JBOD – MB982SPR-2S R1 (special order only) |
| Optional Certifications Available for FatCage RAID MB901SPR-B | |
| TAA | Trade Agreements Act Compliance |
| UL | Safety Standard Certification |
| UL94 | Flammability of Plastic Materials |
| FCC | Federal Communications Commission Compliance |
| Wide Temperature | MIL-STD-810H - Method 501.7 & 502.7 |
| • | Supports 2 x 2.5” or 3.5” SATA HDD/SSD |
| • | Installs into any standard external 2 x 5.25” optical drive bay |
| • | Supports up to 6 Gbps data transfer speed |
| • | Built-In JMS562 hardware RAID 1 mirroring (SAFE) chipset |
| • | Easy to read RAID status LED indicators for drive power, access, fail, and RAID 1 rebuilding process supports SATA and 15-pin power cable with locking latch design |
| • | Anti-Vibration Technology (AVT) – reduces noise and protects against environmental damage |
| • | Active Power Technology (APT) – saves power by shutting the device down when no drive is installed |
| • | Industry-leading 3-year warranty against all defects |
| • | Complimentary support from professionally trained US-based technical support agents |
| Model Number: | MB901SPR-B |
| Color: | Black + sliver |
| Support Drive Size: | 2 x 2.5"/3.5" SSD/HDD |
| Compatible Drive Type: | SATA |
| Number of Drives: | 2 |
| Max Drive Height: | 2.5" HDD/SSD up to 15mm height 3.5" HDD up to 26.1mm height |
| Drive Bay: | 2 x external 5.25" drive bay |
| Host Interface: | 1 x SATA 7pin |
| Power Input: | 2 x 15pin SATA power connector |
| Transfer Rate: | Up to 6G/bs. (depending on hard drive speed) |
| Support HDD Capacity: | No limitation |
| Drive Cooling: | Metal heat dispersion |
| Support Hot-Swap : | Yes |
| RAID Function : | RAID 1 (SAFE) |
| Controller IC: | JMicron – JMS562 |
| Structure / Material: | Metal with partial plastic ABS |
| Dimension (W x H x L): | 146.4 x 85.8 x 200.4mm |
| Product Net Weight: | 1,052g |
| Package Gross Weight: | 1,360.1g |
| Supported Operating System: | Windows 11, 10, 8.1, 8, 7 and Vista |
| RAID 1 Status LED Indicator: | RAID 1 configuration is normal: solid green degraded RAID 1: LED off |
| Rebuilding Progress LED Indicator: | Divide the progress into four stages: Flashing green |
| HDD Fail LED Indicator: | HDD fail: solid red in corresponded device slot Double source: solid red in both device slots Capacity error: Solid red in the device slot which has smaller capacity drive |
| Double Source LED Indicator: | Double source: solid red |
| Capacity Error LED Indicator: | Capacity error: solid red |
| Drive Activity LED Indication: | Empty bay: LED off Drive power: solid green HDD fail: solid red HDD access: flashing green |
| Package Contents: | Device, user manual, screws |
| SATA Connector Insertion Rate: | 10,000 |
| Humidity: | 5%~65% RH |
| Operating Temperature: | 0°C to 60°C (32°F to 140°F) |
| Storage Temperature: | -35°C to 70°C (-31°F to 158°F) |
| Compliance: | CE, RoHS, REACH |
| Warranty: | 3 years |
Compatible Drive Tray (Caddy):
Related Products:
Related Products Series:
Quick Link:
Q: Does MB901SPR-B support the new SATA 3.3 Power Disable feature (PWDIS)?
A: The MB901SPR-B does not support the SATA 3.3 PWDIS feature. If you install the SATA HDD/SSD with PWDIS in MB901SPR-B , the drive will not spin, and the system won't detect the drive. See the list below for known SATA HDD/SSD with the PWDIS feature.
While we recommend to avoid using the SATA HDD/SSD with PWDIS, you can use the methods below to disable the PWDIS feature physically if you already purchased the drive:
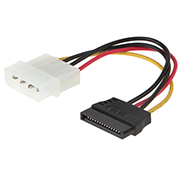
Method 1 – Using the Molex to SATA adapter or cable to disconnect the power to Pin 3 of the SATA power connector.
 |
 |
|
| Molex to SATA Adapter | Molex to SATA Cable |
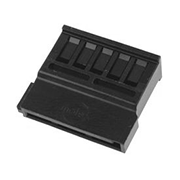
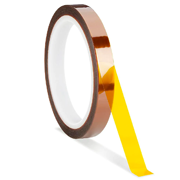
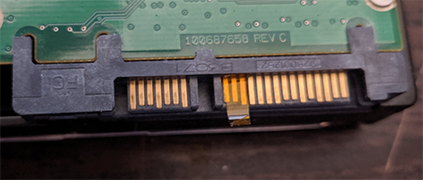
Method 2 – Placing Kapton tape on Pin 1-3 of the SATA power connector to isolate the 3.3V power, as shown below.
 |
 |
Please contact tech@icydock.com if the problem persists.
Q: What is RAID and what are different mode?
A: Note: Not all ICY DOCK enclosure support each of the RAID modes described below. For more information on the RAID modes that your enclosure supports, refer to the manual or the icydock.com product page.
Redundant Array of Independent Disks (RAID) is a virtual disk technology that combines multiple physical drives into one unit. RAID can create redundancy, improve performance, or do both.
RAID should not be considered a replacement for backing up your data. If critical data is going onto a RAID array, it should be backed up to another physical drive or logical set of drives.
The following are terms that normally used in connection with RAID:
• Striping: data is split between multiple disks.
• Mirroring: data is mirrored between multiple disks.
• Parity: also referred to as a checksum. Parity is a calculated value used to mathematically rebuild data.
Different RAID levels exist for different application requirements.
Refer to the following table for the list of RAID modes offered by some ICY DOCK products:
| RAID MODE | Description | Operation | Advantages | Disadvantages | Recovery |
|---|---|---|---|---|---|
| RAID 0 | Striped disks | Data is split evenly between two or more disks. | Large size and the fastest speed. | No redundancy. | If one or more drives fails, this results in array failure. |
| RAID 1 | Mirrored disks | Two drives have identical data on them. | A single drive failure will not result in data loss. | Speed and size is limited by the slowest and smallest disk. | Only one drive is needed for recovery. |
| JBOD | Just a Bunch Of Disks | Any number of drives are accessed independently by the operating system. | Software RAID modes can be used. | Hardware RAID may have better performance. | N/A |
| BIG | Spanning or Concatenation | Data is written on one drive until it is full, and then the next drive(s) until it or they are full. | Creates a very large and simple array. | No redundancy. | N/A |
Q: How do I rebuild my RAID 1 array?
A:
1.Determine which drive is operational by using the RAID monitoring software (if available) or test each drive individually on a different hard drive enclosure or by connecting each drive directly to a computer’s SATA port.
2.Replace the failed drive with an identical hard drive.
3.The array will rebuild and is accessible during the rebuilding process.
Note 1: It is recommended to use a new identical hard drive for the rebuild. To use a used drive, we recommend use Window’s DiskPart command to clean and format the used hard drive before you start rebuilding.
Note 2: Before you start the rebuilding process, make sure the replacement drive has no previous RAID table in it.
Q: I'm unable to format a hard drive previously used in RAID configuration and cannot delete the RAID table.
A:
It is required to perform low-level formatting to erase the RAID table written on the drive, which is not supported by Windows disk management. Please check HERE detailed instructions on how to erase the RAID table.
Q: Everything is connected, but nothing is working. What do I do?
A:
When you troubleshoot issues with a hard drive enclosure, there are some quick tests that you can complete to rule out potential problems. You can test to make sure that the following components are working correctly and are not the source of the issue:
• Cables (USB, SATA, SAS, Mini-SAS, etc)
• Hard drives / SSD (M.2 drive, 3.5'' hard drive, solid state drive, etc)
• Hard drive enclosure (converter, mobile rack, cage, and external enclosure)
To test your setup components, try the following:
• Connect the hard drive directly to the system or use the hard drive in another enclosure to see if the problem is with the hard drive.
• Use the cables, hard drives, and hard drive enclosure in another setup to see if the problem is with the components or the setup.
• Use a different cable, hard drive, and hard drive enclosure in your setup to see if the problem persists. Ideally, you should test a component that you know works in another setup.
When you test the hard drive and hard drive enclosure, it is recommended that you do the following:
•To check Disk Management, press the Windows key + R, type diskmgmt.msc, and press Enter. Check to see if your hard drive is listed.
• If the hard drive is listed with unallocated space, the hard drive needs to be reformatted. Right-click unallocated and click New Simple Volume. Follow the on-screen instructions to complete the reformatting.
Note: Formatting a hard drive erases all of the data on it. Make sure that you back up all of your data before you reformat the hard drive.
• If the hard drive is listed as healthy but does not have a drive letter, for example, C:, right-click healthy and click Change Drive Letter and Paths. Click Add, assign a drive letter, and click OK.
Note: A formatted hard drive will not show up in Computer or My Computer until it has a drive letter assigned to it.
For additional help with setting ICY DOCK RAID enclosure, please contact us by email.
Q: Can I remove any hard drive from the MB901SPR-B RAID array, place it into a drive duplicator to copy data, and then return the hard drive back to the MB901SPR-B RAID array for continued use?
A: Any RAID array created through MB901SPR-B carries a unique RAID table, enabling the MB901SPR-B RAID chipset to recognize the RAID array information on the hard drive. This is crucial for data matching and RAID rebuilding in case of hard drive failure or data corruption. Removing a hard drive from the RAID array and copying data to it via a drive duplicator may corrupt the RAID table on that drive. This can lead to reading errors or a failure in RAID rebuilding process as the RAID chipset may no longer recognize it. As such, we strongly advise against removing hard drives from the MB901SPR-B RAID array for such purposes and also recommend not using the MB901SPR-B as a drive duplicator.